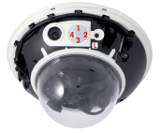
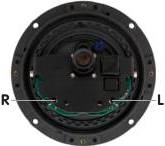
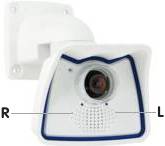
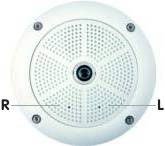
(as seen by the camera)

(as seen by the camera)
The camera starts automatically as soon as the power supply (or a network or ISDN cable with inline power) has been plugged in.
In order to manipulate the camera at start-up, use the keys on the camera. You can start the camera either using the factory IP address or with DHCP support to obtain a dynamic IP address (provided a DHCP server is available in your network). If you use DHCP support, the IP address and other network data is announced automatically as a voice message.
Note: For Web and Basic camera models, the network settings are not announced since these models do not have an audio feature.
The MOBOTIX camera has two keys (R, L), which are labeled as seen by the camera:
| R = right side of camera (as seen by the camera) |
 |
L = left side of camera (as seen by the camera) |
Upon startup, the camera tries to obtain an address from a DHCP server on your local network.
Once startup has been completed, the camera automatically announces its IP address, its network mask and its MAC address (exception: Web and Basic models).
Note: If you would like to have a running camera repeat its network settings, simply press the R key once.
You would like to start the camera using the factory default network configuration.
The camera is accessible again using the factory default settings. Note that the passwords will not be reset if the camera is booted with the factory default settings.
Using the integrated magnetic switch under the outer shell of the camera allows modifying the startup behavior of the MOBOTIX D12. You can start the camera either using the factory default settings (default IP address) or with DHCP support to obtain a dynamic IP address (provided a DHCP server is available in your network). If you use DHCP support, the IP address and other network data is announced automatically as a voice message.
The MOBOTIX D12 only has one "key" that is actuated using the magnet in the back of the custom tool delivered with the camera. Remove the camera's outer shell to reach the key.
| Key "L" |  |
 |
Upon startup, the camera tries to obtain an address from a DHCP server on your local network.
Once startup has been completed, the camera automatically announces its IP address, its network mask and its MAC address.
Note: If you would like to have a running camera again announce its network settings, simply hold the magnetic side of the custom tool to the spot labeled "L" in the figure.
You would like to start the camera using the factory default network configuration.
The camera is accessible again using the factory default settings. Note that the passwords will not be reset if the camera is booted with the factory default settings.
Note: If you use the camera keys to load a configuration, this configuration is not automatically saved. Upon restarting the camera without using the camera keys, the configuration last saved will be used.
In order to manipulate the camera at start-up, use the keys on the camera's body (the D24 has its keys on the inside). You can start the camera either using the factory IP address or with DHCP support to obtain a dynamic IP address (provided a DHCP server is available in your network). If you use DHCP support, the IP address and other network data is announced automatically as a voice message.
Note: For Web and Basic camera models, the network settings are not announced since these models do not have an audio feature.
The MOBOTIX camera has two keys (R, L), which are labeled as seen by the camera:
| R = right side of camera (as seen by the camera) |
 |
L = left side of camera (as seen by the camera) |
 |
||
 |
Upon startup, the camera tries to obtain an address from a DHCP server on your local network.
You can now access the camera using the IP address it just announced.
Note: If you would like to have a running camera repeat its network settings, simply press the R key once.
Note: Audio output on a D24 camera is only possible using a connected and activated ExtIO.
You would like to start the camera using the factory default network configuration.
The camera is now accessible again using its factory IP address (see label on the camera housing).
Note: If you use the camera's L key to load the factory network configuration, this configuration is not automatically saved to flash memory. Upon restarting the camera the next time without using the camera's L key, the most recently stored network configuration will be used.
Note: Note that the passwords will not be reset if the camera is booted with the factory default settings.
In order to manipulate the camera at start-up, use the keys on the camera. It is possible to reset the camera's current configuration to the factory default settings, or activate the automatic initial set-up.
The camera is equipped with two keys, a lights key and a bell key:
 |
Upper key (lights) | |
| Lower key (bell) |
Upon start-up the camera executes an automatic initial set-up.
If a Keypad/Keyless module is installed, its number keys flash simultaneously upon completion of the automatic initial set-up. You can now access the camera using the IP address it just announced.
You would like to start the camera using the factory default network configuration.
The camera is now accessible again using its factory IP address (see label on the camera housing).
Note: If you use the camera's lights (upper) key to load the factory network configuration, this configuration is not automatically saved to flash memory. Upon restarting the camera the next time without using the camera's lights key, the most recently stored network configuration will be used.
Note: Note that the passwords will not be reset if the camera is booted with the factory default settings.
If the regular operating system is damaged while Updating the System Software, the camera will automatically use the fully functionally backup operating system when booting the next time. All previous settings will remain intact. The camera will hence remain reachable after the next reboot although it is running on the backup operating system.
The Backup operating system always shows the software version at the time when the camera had been delivered. The backup system cannot be overwritten.
In the event that Updating the System Software has failed, you should open the Camera Status to check the Software Version of the camera. If the software version corresponds to the version at the time of the delivery, you should restart the upload process with the new version.
| de, en |